KEBA - A Keyboard
The goal is a keyboard suitable both as a general purpose UNIX workstation keyboard and as a NED keyboard. The project name is KEBA.
Size
Picture a rectangle from the bottom-left Control key to the upper right
Backspace on a traditional 104-key keyboard. That entire block is the core.
When my hands leave the core, it is as disruptive to my typing as when I reach for the mouse. Thus, the new keyboard will only be the size of the core. In order to utilize the large number of pre-existing keyboard cases and accessories, I will target the “60% keyboard” size, mounting holes and connector location.
Layout
The single, universal piece of advice I have received is that, if I want to retain my muscle memory for a traditional keyboard, my alterations must not be minor. Only a significant break from a traditional layout will allow my brain to train a new set of memories without meddling with the old set.
I’m going to follow that advice.
Physical Layout
Many of the keys accessible on a traditional keyboard via extending my pinky
finger (think: -=[]\'/.) are difficult to hit accurately. I consistently end
up one key off when trying to enter any kind of brace ((){}[]). However, my
pinky was able to easily navigate the block of function keys adjoined to the
left side of the keyboard core on a Sun keyboard.
As those Sun keys are laid out in a grid, a pure ortholinear layout seems logical. This also plays into the ‘sufficiently different’ criteria. By forcing my fingers to move to unaligned (w.r.t. a traditional keyboard) locations, my brain should switch back to traditional layout when presented with a staggered keyboard.
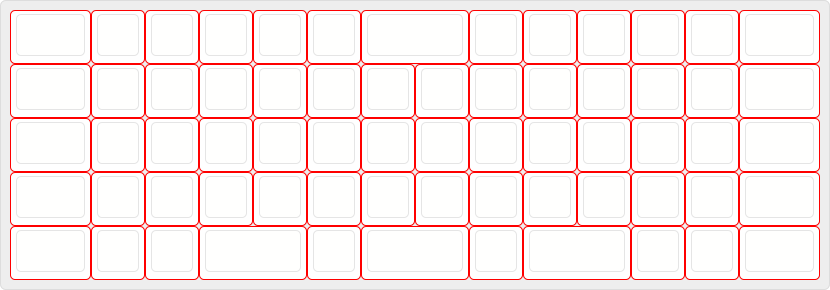
Since the block Sun adjoined was a 2x5 grid and the upper-most and lower-most keys were at the edge of comfort, we will go with five rows. This fits cleanly into the 60% keyboard case.
Although a 60% case will allow 15 columns of keys, it was difficult to accurately place my hand on top of the outermost function keys, instead frequently sliding over the key while pressing it down. To avoid this, remove one column of keys and make the two outermost columns 1.5u wide.
After analyzing my keystrokes by lightly marking the top of my keys, I discovered that my spacebar is only struck over a surface corresponding to 2.5 key widths. Given the ortholinear layout, we will reduce the spacebar to 2u wide and include multiple 2u buttons.
Putting together the current criteria, we arrive at the following layout:
Logical Layout
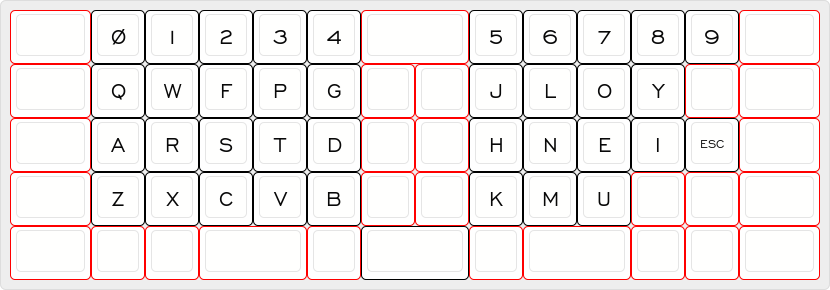
We first consider the alphanumerics. This consists of a 10x4 grid with four
empty spots (the ;/., keys). When placing it into the 12x4 space available,
split it to allow for a wider spread of the hands, creating an easier angle on
the wrists. This also avoids a double column of utility keys on the outer ends
of the board, instead moving one column from each side into the middle and
making it easier to accurately hit the pinky-associated utility keys.
The alphabetic keys will reside in a modified Colemak configuration with the
U key moving down two spots, just to the right of the M key, and the O
key moving to the U key’s old location. This modified Colemak layout allows
placement of Escape directly underneath the right pinky.
While we’re at it, rearrange the numbers into the correct order.
That thinking generates this alphanumeric+Escape core layout:
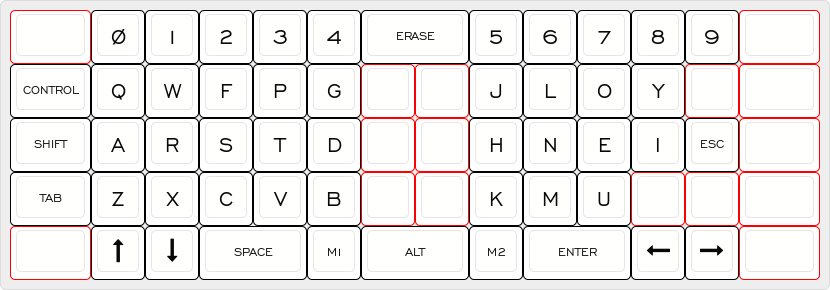
The remaining special keys are
Tab, Shift, Control, Alt, Space, Enter, Backspace.
Since Backspace is never pressed in the course of regular typing, we locate
it at middle-top where each index finger can reach it with a small stretch.
Given their frequent use, Space and Enter are placed under the thumbs.
Shift moves to the most convenient pinky location. Then Tab is placed
underneath that location, still easily accessible but the least accessible of
the Ctrl/Shift/Tab combo.
My computing environment uses Alt to send instructions to the operating
environment and Control to send instructions to individual programs.
Consequently, we place Control to the left of the QWFPG row for convenient
use with the left side alphabetic keys and place Alt bottom-center so the
entire keyboard is easily reached while it is depressed.
In practice, I found that I never use the right hand Alt, Shift or
Control so there will be only one of each on this keyboard.
Arrow keys are assigned under the assumption that up/down arrow keys should not
share a hand with Enter since one frequently pages through a list with
up/down arrows and selects with Enter, like when selecting a command from the
command line history. By keeping them on separate sides of the board, both
hands can be used.
The four corner keys will be reserved for user-programmable shortcuts.
That leaves us with the following layout:
Finally, all the remaining keys will be mapped via four overlays, selectable via two Meta keys on the bottom row. Holding a combination of these keys down will select the overlay. A single tap of the key will enable the overlay for a single additional keypress. A double-tap of the key will lock the overlay on, or turn it off.
Via this mechanism, the remaining 12 blank keys can encode 48 values.
Importantly, overlays will NOT change any keys other than these 12 blank keys. Every key in the following set will remain unchanged in every overlay:
a-z, 0-9, Control, Shift, Alt, Tab, Space,
Enter, Backspace, Arrows, Escape, Meta1, Meta2
At a minimum, the overlays need to include the following characters from a standard 104-key:
`~!@#$%^&*()_+-=[]{}\|;:'",.?/<>
Including other characters, say some logic and set theory symbols, is enticing
but would require a custom keyboard definition in each OS I use. Perhaps
careful assignment of keycodes so as to stay outside the standard 104-key
definitions would allow a ‘compatibility’ mode. For that reason, I would like
to keep the combined (Meta1+Meta2) overlay blank, if possible.
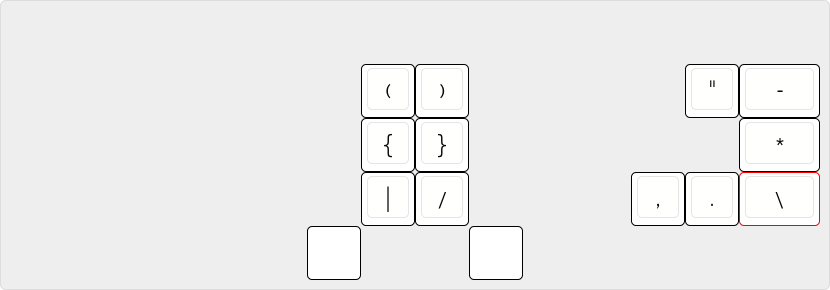
Assignment of the overlay keys is still tentative.
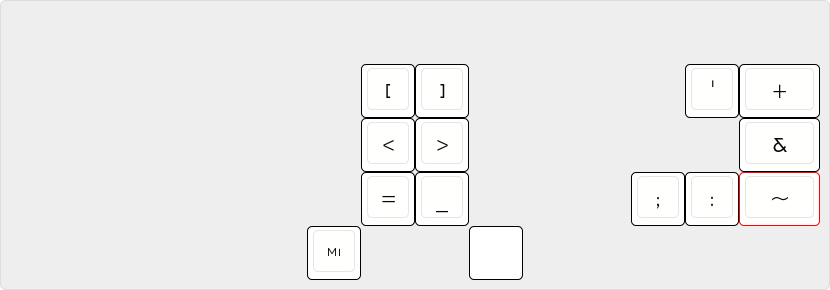
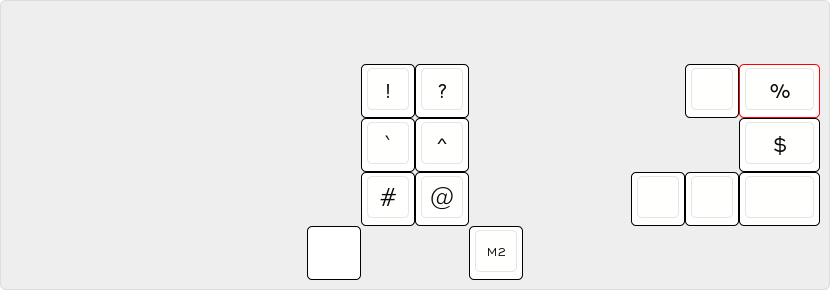
I know I want all the brackets down the middle. The remaining assignments are made in consideration of the key’s frequency of use in/at normal English writing, the UNIX command line, and the C programming environment. Allowing overlap, I see those sets as follows.
English Language:
!,.?
UNIX Commandline:
`~&*_-\/|"
C Language:
#&*-+=;:'",/
Other:
@$%^
When assigning overlays, since the ‘extra’ overlay buttons are on the right
hand side, the left overlay button, or Meta1, should take precedence over the
right overlay button. In other words, the priority should be:
Default > Meta1 > Meta2 > Meta1+Meta2
The following are the three overlays as currently assigned:
Keyswitches
In the linear vs clicky vs tactile decision, my normal is most people’s extreme. I consider an IBM Model M to be the baseline for an adequate computer keyboard, not some ultimate endpoint.
The switches most frequently recommended for someone that likes the Model M are the Cherry MX Greens. I already use MX Blues from the same family to repair Tektronix terminals and find the tactile style suitable. If the information on the internet is to be believed, MX Greens are still lighter than a Model M but are the heaviest MX-series switches on the market.
It might make sense to install Mill-Max sockets in one PCB so I can easily swap keyswitches until I find what I want, despite the cost. Even if the MX Greens are where I settle, I won’t know they’re right until I also try some other switches.
Keycaps
Keycaps should be either the full SA profile, or all SA Row 3 profile. Alphanumeric caps should have a SINGLE character on them, not a double printing that includes the ‘shifted’ character. All overlay and most non-alphanumeric caps like Space and Enter should be blank. Meta keys can be playful, consider PLOT/STOP or BREAK/RESET from my existing keycap inventory.
Computer Interface
Since both QMK and the STM32 natively support USB, that is a natural interface to choose.
Alternatively, I could expose a logic level UART and design a series of inline dongles to convert to whatever signalling I want. That allows me to easily connect the keyboard in place of a USB, PS/2, Sun Type 3 & 5, Tektronix terminal, etc keyboard. This option would require custom firmware.
Human Interface
The keyboard should include LED lights behind the keys for use in communicating with the user. By default, the lights should be off and should only briefly light to communicate. At a minimum, there should be a different blink for each Meta key to indicate when it is triggered/toggled. Perhaps multi-color LEDs to indicate the different overlays?
If using USB, expose a virtual UART to the host that allows for configuration. If using a generic UART, configure the keyboard to enter a programming mode on that same UART when some contrived combination of keys is pressed. Either way, the keyboard should be easily configurable via a human-readable UART interface.
Firmware
If I use a USB interface, I can copy my STM32 circuit from Liquid Fusion and use it with QMK until I get around to writing my own code. Will QMK support the ‘toggle by double-tap’ feature I envison for the Meta keys?
Template
The following JSON is a template of the static key assignments that can be uploaded to http://www.keyboard-layout-editor.com/.
[
  [
    {
      "c": "#ffffff",
      "t": "000000",
      "p": "SA R3",
      "sm": "cherry",
      "sb": "cherry",
      "st": "MX1A-F1xx",
      "a": 7,
      "f": 9,
      "w": 1.5
    },
    "",
    "Ø",
    "1",
    "2",
    "3",
    "4",
    {
      "f": 4,
      "w": 2
    },
    "ERASE",
    {
      "f": 9
    },
    "5",
    "6",
    "7",
    "8",
    "9",
    {
      "w": 1.5
    },
    ""
  ],
  [
    {
      "f": 4,
      "w": 1.5
    },
    "CONTROL",
    {
      "f": 9
    },
    "Q",
    "W",
    "F",
    "P",
    "G",
    "",
    "",
    "J",
    "L",
    "O",
    "Y",
    "",
    {
      "w": 1.5
    },
    ""
  ],
  [
    {
      "f": 4,
      "w": 1.5
    },
    "SHIFT",
    {
      "f": 9
    },
    "A",
    "R",
    "S",
    "T",
    "D",
    "",
    "",
    "H",
    "N",
    "E",
    "I",
    {
      "f": 4
    },
    "ESC",
    {
      "f": 9,
      "w": 1.5
    },
    ""
  ],
  [
    {
      "f": 4,
      "w": 1.5
    },
    "TAB",
    {
      "f": 9
    },
    "Z",
    "X",
    "C",
    "V",
    "B",
    "",
    "",
    "K",
    "M",
    "U",
    "",
    "",
    {
      "w": 1.5
    },
    ""
  ],
  [
    {
      "w": 1.5
    },
    "",
    "<i class='fa fa-long-arrow-up'></i>",
    "<i class='fa fa-long-arrow-down'></i>",
    {
      "f": 4,
      "w": 2
    },
    "SPACE",
    "M1",
    {
      "w": 2
    },
    "ALT",
    "M2",
    {
      "w": 2
    },
    "ENTER",
    {
      "f": 9
    },
    "<i class='fa fa-long-arrow-left'></i>",
    "<i class='fa fa-long-arrow-right'></i>",
    {
      "w": 1.5
    },
    ""
  ]
]
The following JSON is a template of the overlay keys that can be uploaded to http://www.keyboard-layout-editor.com/.
[
  [
    {
      "c": "#ffffff",
      "t": "000000",
      "p": "SA R3",
      "sm": "cherry",
      "sb": "cherry",
      "st": "MX1A-F1xx",
      "a": 7,
      "f": 9,
      "w": 1.5,
      "d": true
    },
    "",
    {
      "d": true
    },
    "",
    {
      "d": true
    },
    "",
    {
      "d": true
    },
    "",
    {
      "d": true
    },
    "",
    {
      "d": true
    },
    "",
    {
      "f": 4,
      "w": 2,
      "d": true
    },
    "",
    {
      "f": 9,
      "d": true
    },
    "",
    {
      "d": true
    },
    "",
    {
      "d": true
    },
    "",
    {
      "d": true
    },
    "",
    {
      "d": true
    },
    "",
    {
      "w": 1.5,
      "d": true
    },
    ""
  ],
  [
    {
      "f": 4,
      "w": 1.5,
      "d": true
    },
    "",
    {
      "f": 9,
      "d": true
    },
    "",
    {
      "d": true
    },
    "",
    {
      "d": true
    },
    "",
    {
      "d": true
    },
    "",
    {
      "d": true
    },
    "",
    "",
    "",
    {
      "d": true
    },
    "",
    {
      "d": true
    },
    "",
    {
      "d": true
    },
    "",
    {
      "d": true
    },
    "",
    "",
    {
      "w": 1.5
    },
    ""
  ],
  [
    {
      "f": 4,
      "w": 1.5,
      "d": true
    },
    "",
    {
      "f": 9,
      "d": true
    },
    "",
    {
      "d": true
    },
    "",
    {
      "d": true
    },
    "",
    {
      "d": true
    },
    "",
    {
      "d": true
    },
    "",
    "",
    "",
    {
      "d": true
    },
    "",
    {
      "d": true
    },
    "",
    {
      "d": true
    },
    "",
    {
      "d": true
    },
    "",
    {
      "f": 4,
      "d": true
    },
    "",
    {
      "f": 9,
      "w": 1.5
    },
    ""
  ],
  [
    {
      "f": 4,
      "w": 1.5,
      "d": true
    },
    "",
    {
      "f": 9,
      "d": true
    },
    "",
    {
      "d": true
    },
    "",
    {
      "d": true
    },
    "",
    {
      "d": true
    },
    "",
    {
      "d": true
    },
    "",
    "",
    "",
    {
      "d": true
    },
    "",
    {
      "d": true
    },
    "",
    {
      "d": true
    },
    "",
    "",
    "",
    {
      "w": 1.5
    },
    ""
  ],
  [
    {
      "w": 1.5,
      "d": true
    },
    "",
    {
      "d": true
    },
    "",
    {
      "d": true
    },
    "",
    {
      "f": 4,
      "w": 2,
      "d": true
    },
    "",
    "M1",
    {
      "w": 2,
      "d": true
    },
    "",
    "M2",
    {
      "w": 2,
      "d": true
    },
    "",
    {
      "f": 9,
      "d": true
    },
    "",
    {
      "d": true
    },
    "",
    {
      "w": 1.5,
      "d": true
    },
    ""
  ]
]